TL;DR version: Fussy cutting is in essence the art of trimming around a more complex shape to literally “cut it out” from a background, whether that’s part of a photograph or a piece of line art with a more distinctly obvious edge. You can do fussy cuts with or without borders for junk journal ephemera, depending on your preference (and the shape in question), but make sure you use the right pair of scissors for the job!
Whether you’re a paper crafting aficionado or just getting started, I thought it would be useful to write up this guide on everything useful to know about fussy cutting. Some of these tips are stuff that would have made my life so much easier when I first got into junk journaling: so buckle up, grab a pair of scissors (the right pair, that is… more below) and let’s get on with it.
Understanding fussy cutting
Before diving into the world of fussy cutting, let’s take a moment to understand what it is. Fussy cutting is the process of selectively cutting out specific designs or shapes from a piece of paper, rather than cutting the paper as a whole. This technique is especially useful for scrapbooking, card making, quilting, and other paper crafts where precision and attention to detail are essential, and it’s definitely one of a junk journal crafter’s stock-in-trade techniques.
What is fussy cutting?
Well, I pretty much covered that above. But here’s a nifty fact – the term “fussy cutting” actually came from the quilting industry, where it was used to describe the process of carefully cutting individual pieces of fabric to create intricate designs. Papercraft borrowed/appropriated the term so now you’ll often find it used freely within both areas. Needless to say, do not get your paper fussy cut scissors mixed up with your fabric fussy cut scissors, if you’re doing both!
A short (unfussy) history of fussy cutting
While the term may be relatively new, the technique of fussy cutting has been around for centuries. In fact, some of the oldest examples of fussy cutting can be found in Chinese and Japanese paper art, where intricate designs were carefully cut out by hand using tiny scissors and knives.
Chinese paper cutting, also known as Jianzhi, dates way back, potentially as far as the 2nd century AD, and is still a popular art form today. The intricate designs and patterns created by these fussy cutting techniques were/are often used to decorate homes and temples, and also given as gifts to friends and family, especially on festive occasions.
In Japan, the art of paper cutting is known as Kirigami or kimie, and is technically a variant on the more famous origami, with the main difference being that the paper is cut as well as folded. Some modern Kirigami art can result in three dimensional designs that stand out from the page (this was pioneered in the 1980s by Nahoko Kojima) without using glue.
Many other cultures have a history of artistic expression with cut paper, often heavily influenced by the ancient Chinese traditions. For example in Indonesia there is batik, generally framed in profile to highlight the intricate details that are cut out, along with a rich cultural history of Jewish paper cutting, which is even now sometimes used to decorate traditional marriage contracts, tissue paper focused papel picado in Mexico, plus Wycinanki (or Vytynanky) in Slavic countries like Poland and Ukraine, and many more. So safe to say this isn’t a new art by any means!
Fussy cutting vs traditional cutting
Let’s be real here – regular, old-fashioned cutting is boring. Anyone can do it with a bit of patience and some half decent scissors. But fussy cutting? That’s where you start feeling less like a kid in preschool and more like a Proper Crafter! With fussy cutting, you have complete control over the design and layout of your project.
Not only does fussy cutting allow you to create unique designs, but it also adds an extra level of detail and dimension to your projects. By selectively cutting out specific designs or shapes, you can create a layered effect that adds depth and interest to any journal page or spread, and the right combinations can give some really eye-popping results, whatever your chosen aesthetic.
Essential fussy cutting tools
Now that you’re ready to become a fussy cutting master, you’ll need to gather your tools. Here are the essentials:
The right scissors for fussy cutting
The most important tool in any fussy cutter’s arsenal is a good pair of scissors. Look for scissors with small, fine points to ensure maximum precision when cutting out intricate designs. And while it may be tempting to skimp on price, investing in a good quality pair of scissors will pay off in the long run.
It’s also important to keep your scissors sharp. Dull scissors can cause ragged edges and ruin even the most carefully cut designs. Consider investing in a small sharpening tool to keep your scissors in top condition.
Another factor to consider when choosing scissors is comfort. Fussy cutting can be a time-consuming process, so look for scissors that feel comfortable in your hand and won’t cause cramping or fatigue. Rubberised handles may not be the prettiest thing in the world, but your fingers will thank you after a long cutting session.
The other consideration is the size of the scissors – when dealing with very fine detail you don’t want to be wrestling with a big set with long blades, as this makes things a lot harder to control. Small, short bladed embroidery scissors are a popular choice used by many YouTube journaling crafters. For really fine detail you might prefer to use a craft knife or scalpel, which leads us nicely onto…
The importance of cutting mats
When it comes to fussy cutting, a good cutting mat is essential. Not only will it help protect your work surface from damage, but it will also provide a smooth, even cutting surface that will make the cutting process smoother and more precise, especially when using direct blades rather than scissors.
There are a few things to keep in mind when choosing a cutting mat. First, consider the size. You’ll want a mat that’s large enough to accommodate the size of the paper you’ll be cutting, but not so large that it takes up too much space on your work surface. You may also want a mat with a grid or ruler printed on it to help measure and line up cuts accurately, especially if you do a lot of straight line work rather than wigglier patterns.
Other useful tools for fussy cutting
While scissors and cutting mats are the most important tools for fussy cutting, there are a few other items that can be helpful. For example, a pair of tweezers can be useful for handling tiny pieces of paper, while a ruler or straight edge can help you create perfectly straight lines – get one with a nice safety ridge for your fingers to avoid whoopsies. I’d hugely recommend a metal ruler if you want to do a lot of straight-edging, as especially when using a knife or scalpel you can often wind up with weird shapes as the sharp blade takes the edge of the durn ruler as well as running through the paper!
Also don’t forget about storage. Keeping your tools organized and easily accessible will save you time and frustration in the long run. Whether you just dedicate a specific draw or shelf for all your bits and bobs, or invest in a more substantial tool caddy or storage box to keep your fussy cutting supplies in one place, it’s a lot better (and safer) to know where things are than have to keep rummaging when you’re in the middle of a project.
Tips and techniques for perfect fussy cutting
Now we’re all tooled up, let’s talk fussy cutting techniques and tips. You can just set blade to paper and go, but these handy helper suggestions might make life a bit easier as you go.
Preparing the paper
Before you start cutting, it’s important to prepare your paper. Make sure it’s flat and free from wrinkles or creases. If you’re working with patterned paper, plan out your design in advance to ensure that you’re only cutting out the parts you want (and are including the parts you want). It’s annoying to have just finished a cut and then realise you accidentally missed off a part of the pattern you did want to include, and have to glue-jigsaw it together like a puzzle on your page.
Mastering precision cutting
When it comes to fussy cutting, precision is absolutely key. Take your time and cut slowly and carefully, using small, controlled motions to ensure that you’re cutting out exactly what you want. Squeeze the scissors slowly, and move the paper around your hand and the blade, not your hand around the paper – this is really useful for maintaining control. Also make sure you cut from the base of the scissor blades, don’t “snip” using the tips. You’ll want to angle the scissors against the paper, too, so you can clearly see the design as you cut, rather than having to constantly crane your neck around using a more conventional edge-on positioning.
Tips for Cutting Intricate Designs
If you’re working with intricate designs, it can be helpful to start by cutting out the larger pieces first, and then moving on to the smaller, more detailed pieces. And remember – practice makes perfect. The more you fussy cut, the better you’ll become. If you’ve got a big project to do, consider “warming up” on some more forgiving fussy cuts before you tackle the big piece, to help get yourself into the right headspace and stretch out your hands.
How to fussy cut
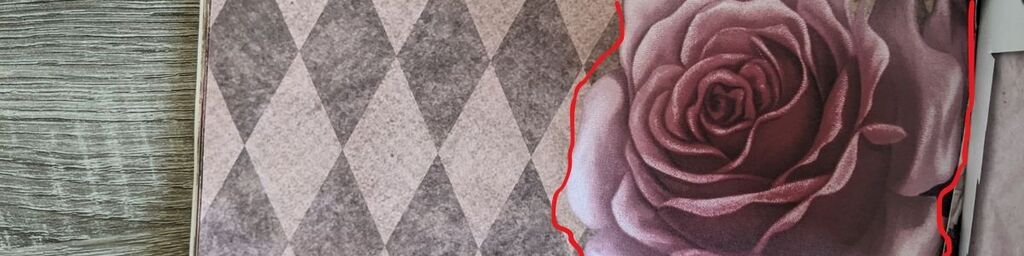
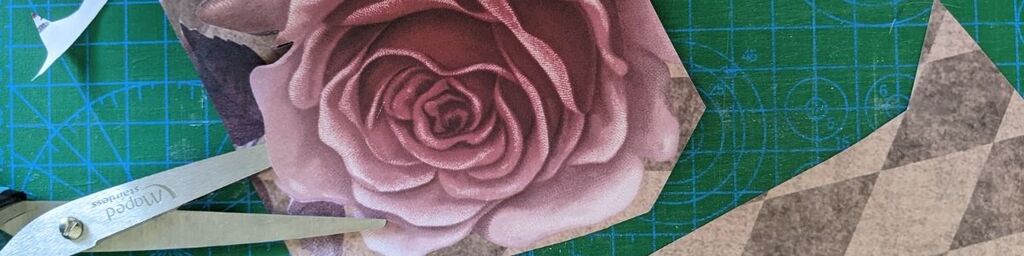
Here’s an example of a distinct shape that I wanted to cut out from its background for a journal spread; the rose. I don’t have anything against the backing, but I wanted the flower to pop on its own, so the plan is to cut roughly around where the red line is on this photo (not actually part of the image, I just added that to show what I mean).
I start by getting rid of the excess background so I have less paper to wrestle with.
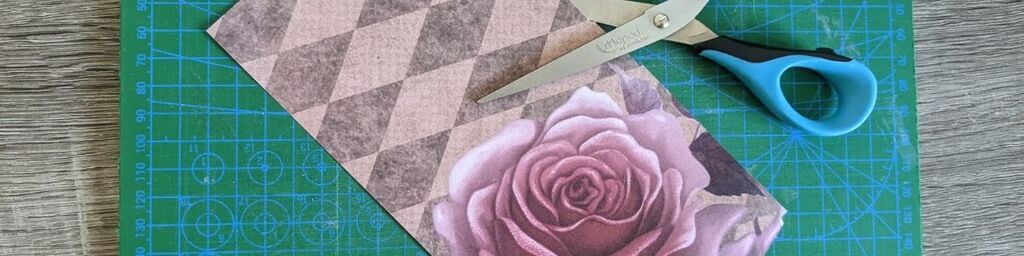
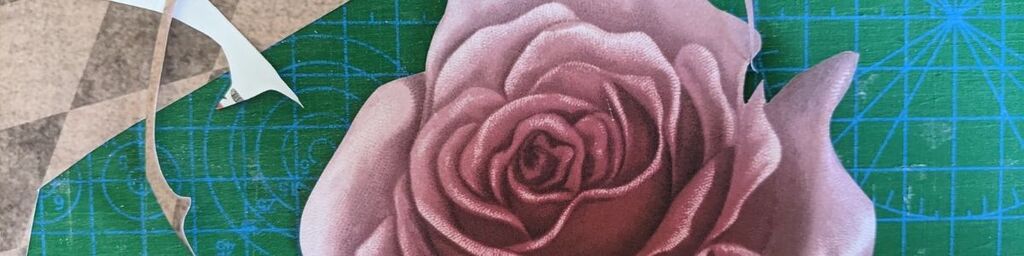
With the bulk excess gone, I can trim more carefully around the shape itself.
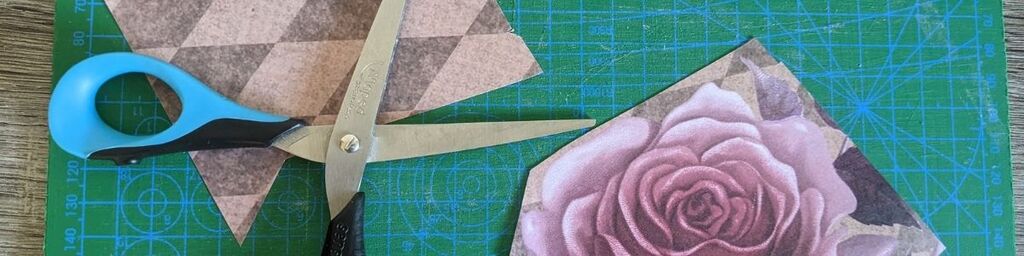
Now I’ve not got a ton of excess paper flopping about, I can get into the specifics of the fussy cut itself, starting with the smaller and more self-contained edges around the petals which are simpler to separate out.
Now I finish up the detail, using small and careful squeezes while moving the shape around my hand, as mentioned above, and the rose has been successfully extracted from the background!
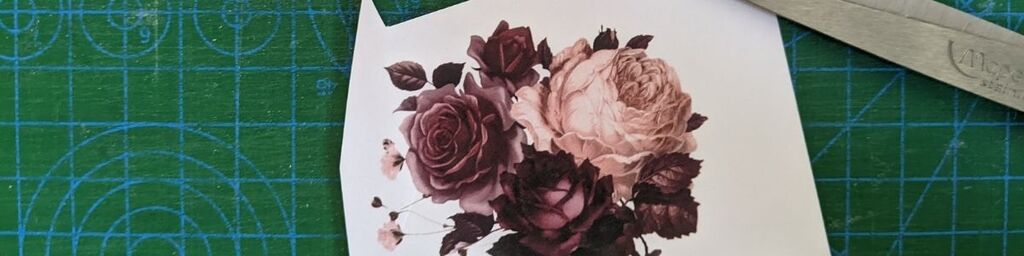
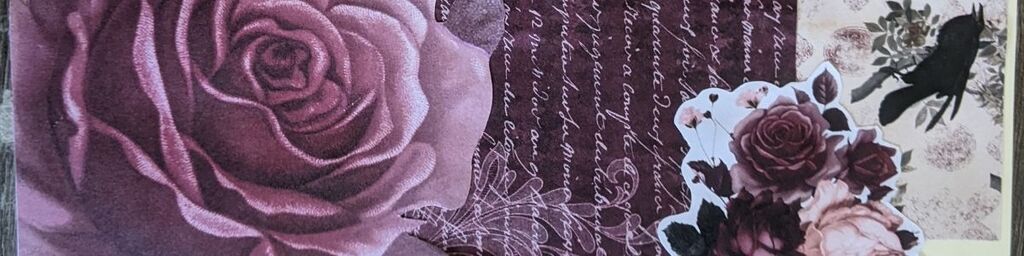
It’s also important to note that you might not want to fussy cut right to the edge for every shape, either because it doesn’t match the look you’re going for, or the shape itself won’t really work like this (for example if it has very fine details or “spindly” elements that would mean it falls apart). This more intricate rose pattern, for example, has some tiddly little flowers on it that would be an absolute devil to fussy cut out. I could exclude them and essentially cut the smaller bits “off” the main shape, but for this particular spread I’d rather have the whole arrangement included.
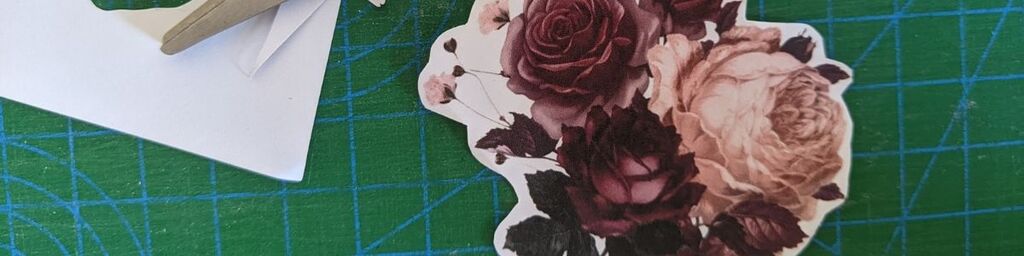
By instead cutting around the shape but leaving a thin outline of the background (in this case white, but it could be anything) I can capture the whole image for the spread without ruining the aesthetic I want by slapping down the whole image and background.
Here are the two flower fussy cuts on part of the spread – slightly different effects, but both still work well for the overall aesthetic I wanted for this page.
And there you have it – everything you could possibly need to know about fussy cutting. Mix and match techniques, borderless or with borders, plain stuck or on fresh backgrounds, and see what you can create. Even if you do snip more than you mean, you can still generally get your shape back with a little careful gluing so be gentle with yourself and remember practice makes, if not perfect, much better!